Perfect TensorFlow
This project is an experimental wrapper of TensorFlow C API which enables Machine Learning in Server Side Swift.
Development Notes
These files are the key part of Perfect-TensorFlow:
Sources
├── PerfectTensorFlow
│   ├── APILoader.swift (886 lines, translated from tensorflow/c/c_api.h)
│   ├── PerfectTensorFlow.swift (2277 lines)
└── TensorFlowAPI
    ├── TensorFlowAPI.c (72 lines)
    └── include
        └── TensorFlowAPI.h (137 lines)
All other Swift sources named as 'pb..swift', which is totally up to 45,000+ lines of code, are automatically generated by updateprotos.sh in the root directory. Unfortunately, if using such a script, you still need to manually edit the public typealias part listed in the *PerfectTensorFlow.swift**.
Up to now there is no such a plan to generate these protocol buffer files dynamically in the Swift Source since Perfect-TensorFlow is a part of Perfect, although it can run independently, all features of Perfect framework are built by Swift Package Manager for consistency consideration. However, since the project is also fast growing, all pull request, ideas, suggestions and comments are welcome!
Quick Start
Installation
Perfect-TensorFlow is based on TensorFlow C API, i.e., libtensorflow.so on runtime.
This project contains an express CPU v1.1.0 installation script for this module on both macOS / Ubuntu Linux, and will install the dynamic library into path /usr/local/lib/libtensorflow.so. You can download & run install.sh. Before running this script, please make sure that wget has been installed onto your computer, otherwise please run either brew install wget for macOS or sudo apt-get install wget for Ubuntu first.
For more installation options, such as GPU/CPU and multiple versions on the same machine, please check TensorFlow website: Installing TensorFlow for C
Perfect TensorFlow Application
To use this library, add dependencies to your project's Package.swift with the LATEST TAG:
.Package(url: "https://github.com/PerfectlySoft/Perfect-TensorFlow.git", majorVersion: 1)
Then declare the library:
// TensorFlowAPI contains most API functions defined in libtensorflow.so
import TensorFlowAPI

// This is the Swift version of TensorFlow classes and objects
import PerfectTensorFlow

// To keep the naming consistency with TensorFlow in other languages such as
// Python or Java, making an alias of `TensorFlow` Class is a good idea:
public typealias TF = TensorFlow
Library Activation
⚠️NOTE⚠️ Prior to use ANY ACTUAL FUNCTIONS of Perfect TensorFlow framework, TF.Open() must be called first:
// this action will load all api functions defined
// in /usr/local/lib/libtensorflow.so
try TF.Open()
Please also note that you can active the library with a specific path, alternatively, especially in case of different versions or CPU/GPU library adjustment required:
// this action will load the library with the path
try TF.Open("/path/to/DLL/of/libtensorflow.so")
"Hello, Perfect TensorFlow!"
Here is the Swift version of "Hello, TensorFlow!":
// define a string tensor
let tensor = try TF.Tensor.Scalar("Hello, Perfect TensorFlow! 🇨🇳🇨🇦")

// declare a new graph
let g = try TF.Graph()

// turn the tensor into an operation
let op = try g.const(tensor: tensor, name: "hello")

// run a session
let o = try g.runner().fetch(op).addTarget(op).run()

// decode the result
let decoded = try TF.Decode(strings: o[0].data, count: 1)

// check the result
let s2 = decoded[0].string
print(s2)
Matrix Operations
As you can see, Swift version of TensorFlow keeps the same principals of the original one, i.e., create tensors, save tensors into graph, define the operations and then run the session & check the result.
Here is an other simple example of matrix operations in Perfect TensorFlow:
/* Matrix Muliply:
| 1 2 |   |0 1|   |0 1|
| 3 4 | * |0 0| = |0 3|
*/
// input the matrix.
let tA = try TF.Tensor.Matrix([[1, 2], [3, 4]])
let tB = try TF.Tensor.Matrix([[0, 0], [1, 0]])

// adding tensors to graph
let g = try TF.Graph()
let A = try g.const(tensor: tA, name: "Const_0")
let B = try g.const(tensor: tB, name: "Const_1")

// define matrix multiply operation
let v = try g.matMul(l: A, r: B, name: "v", transposeB: true)

// run the session
let o = try g.runner().fetch(v).addTarget(v).run()
let m:[Float] = try o[0].asArray()
print(m)
// m shall be [0, 1, 0, 3]
Load a Saved Artificial Neural Network Model
Besides building graph & sessions in code, Perfect TensorFlow also provides a handy method to load models into runtime, i.e, generate a new session by loading a model file:
let g = try TF.Graph()

// the meta signature info defined in a saved model
let metaBuf = try TF.Buffer()

// load the session
let session = try g.load(
    exportDir: "/path/to/saved/model",
    tags: ["tag1", "tag2", ...],
    metaGraphDef: metaBuf)
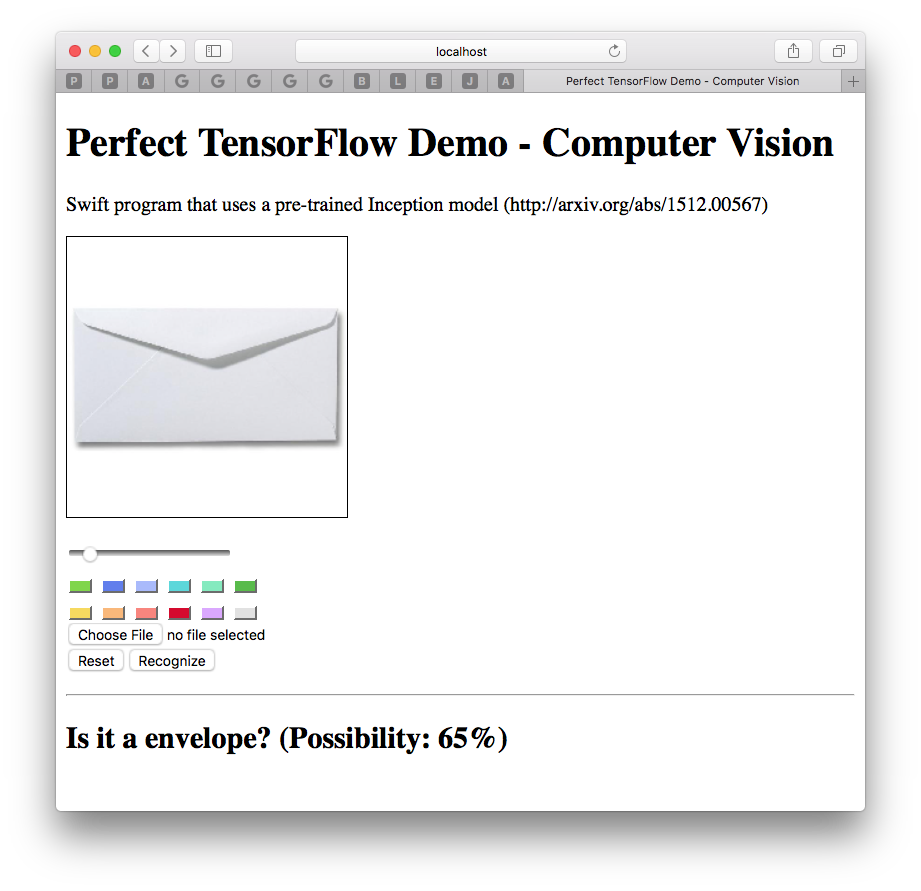
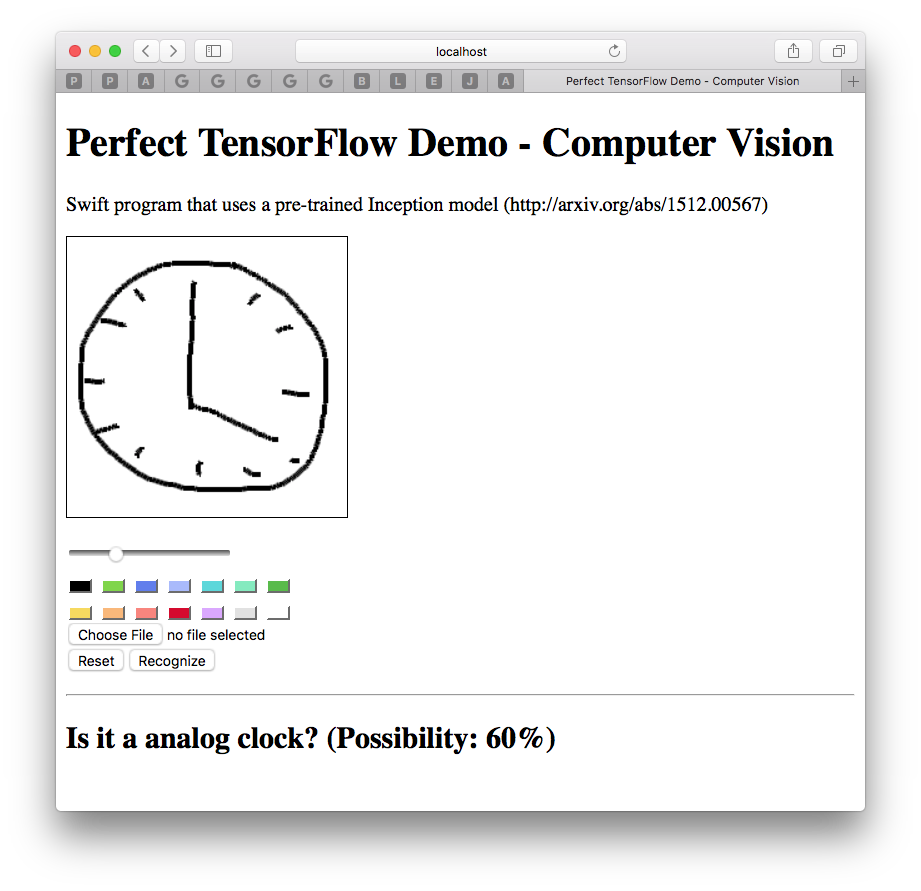
Computer Vision Demo
A detailed example of Perfect TensorFlow for Computer Vision can be found in this repo: Perfect TensorFlow Demo, where you can upload any local images or draw a scribble online to test if the server can recognize the picture content:
API Guide
Perfect TensorFlow is a Swift Class Wrapper of TensorFlow's C API to build, save, load and execute TensorFlow models on Server Side Swift.
⚠️WARNING⚠️: The API is currently experimental and is not covered by TensorFlow API stability guarantees.
The Perfect TensorFlow Computer Vision Server example demonstrates use of this API to classify images using a pre-trained Inception architecture convolutional neural network. It demonstrates:
Graph construction: using the OperationBuilder class to construct a graph to decode, resize and normalize a JPEG image. Model loading: Using Graph.import() to load a pre-trained Inception model. Graph execution: Using a Session to execute the graphs and find the best label for an image.
Please install Perfect TensorFlow library before using.
Classes
There are quite a few classes in Perfect-TensorFlow. Relationship between these classes can be described as the workflow below:
TFLib: TensorFlow C API DLL Low levelled library
  |
TensorFlow: Runtime Library
  |
  |------ Shape: dimension info of a tensor
  |         |
  |       Tensor: multi-dimensional array
  |         |
 Graph -- OperationBuilder: construct an operation from tensors
  |         |
  |       Operation: a graph node that performs computation on tensors
  |         |
  |       Output: a symbolic handle to a tensor produced by an Operation
  |         |
  |------ Session: driver for graph execution.
            |
          Runner: Run Operations and evaluate tensors
Content
| Class Name | Description |
|---|---|
| TFLib | TensorFlow C API low levelled DLL library - suggested for internal use only. |
| TensorFlow | namespace describing the TensorFlow runtime. |
| Shape | The possibly partially known shape of a tensor produced by an operation; create from an Int64 array |
| Tensor | A typed multi-dimensional array; can be created either from a scalar or a typed array. |
| OperationBuilder | A builder for Operations in a Graph. |
| Operation | A Graph node that performs computation on Tensors. |
| Output | A symbolic handle to a tensor produced by an Operation. |
| Graph | A data flow graph representing a TensorFlow computation. |
| Session Runner | Run Operations and evaluate Tensors. |
Protocol Buffers
Perfect TensorFlow depends heavily on Google Protocol Buffers, which means that you can easily save / load most of the objects from / into persistent files or database records in form of either binary bytes or JSON string.
Take Graph as a typical example, you can easily load a pre-trained model from a third party into your Swift program, as the digest source code in Perfect TensorFlow Demo of Computer Vision:
import PerfectLib
import PerfectTensorFlow

typealias TF = TensorFlow

// load a third party graph protocol buffer file:
let fModel = File("/tmp/tensorflow_inception_graph.pb")
try fModel.open(.read)
let modelBytes = try fModel.readSomeBytes(count: fModel.size)
fModel.close()

// import buffer file into Graph Object:
let def = try TF.GraphDef(Data(bytes: modelBytes))
let g = try TF.Graph()
try g.import(definition: def)
⚠️NOTE⚠️ You can get the data buffer by let data = try def.serializedData() or let json = try def.jsonString() vice versa.
TensorFlow Runtime
Class TensorFlow is actually the namespace that represents the TensorFlow runtime.
To align with other language implementation such as Python or Java, make an alias of class TensorFlow is a good idea:
/// load the TensorFlow C API DLL library
import TensorFlowAPI
import PerfectTensorFlow
public typealias TF = TensorFlow
⚠️NOTE⚠️ Prior to use ANY ACTUAL FUNCTIONS of Perfect TensorFlow framework, TF.Open() must be called first:
// this action will load all api functions defined
// in /usr/local/lib/libtensorflow.so
try TF.Open()
Please also note that you can active the library with a specific path, alternatively, especially in case of different versions or CPU/GPU library adjustment required:
// this action will load the library with the path
try TF.Open("/path/to/DLL/of/libtensorflow.so")
Shape
In Perfect TensorFlow definition, Shape is a struct that holding dimensions for a future tensor:
  /// Tensor Shape Object
  public struct Shape {
    public var dimensions = [Int64]()
  }//end class
Tensor
A Tensor is defined as a typed multi-dimensional array.
Generally you don't have to call the initiator of Tensor object directly, but using two static methods will be more efficient: Scalar
Scalar
Scalar Tensor is actually a one dimensional array (or zero dimensional in an other term). To create such a tensor, just pass the variable to the static method Scalar<T>(value: T):
// create an Int32 scalar tensor;
// Please note that Int will be Int64 actually
let x = try TF.Tensor.Scalar(Int32(100))

// create a Float scalar tensor;
// Please note that constant without Float type cast will be Double indeed
let y = try TF.Tensor.Scalar(Float(1.1))

// create a String scalar tensor:
let s = try TF.Tensor.Scalar("Hello, TensorFlow! 🇨🇳🇨🇦")
To get the value of Tensor as a scalar, use asScalar<T>() method:
let x: Int32 = try tensor.asScalar()
Array
Array Tensor requires shape information to create; Also please note that the array has to be flatten to generate the expected array:
/* here is the matrix to input:
| 1 2 |
| 3 4 |
*/
// flatten the matrix first
let m:[Float] = [[1, 2], [3, 4]].flatMap { $0 }

// then turn it into a tensor with shape info.
let tensor = try TF.Tensor.Array(dimenisons: [2,2], value: m)
To get the value of Tensor as an array, use asArray<T>() method:
let y: [Float] = try tensor.asArray()
⚠️NOTES⚠️ If the tensor is a string array, please directly call the strings property, which will actually return an array of Data:
// datastr is actually [Data]
let datastr = tensor.strings

// translate it into [String]
let str = datastr.map { $0.string }
Matrix
Since Perfect-TensorFlow v1.2.1, however, you can apply a multi-dimensional array to a tensor as a matrix without considering the shape or dimensions. The equivalent example of above will look like:
let M = try TF.Tensor.Matrix([[1, 2], [3, 4]])
⚠️NOTES⚠️ Element in a Matrix must be number!
Raw Data of a Tensor
To access raw data of a tensor, you can use either data property, or withDataPointer() method with better performance but tricky pointer operations - and property of bytesCount and type will be useful in this case:
public class Tensor {
    /// get a buffer copy from the tensor value
    public var data: [Int8]

    /// get total size of memory in bytes
    public var bytesCount: Int

    /// check data type of the value / element of value array
    public var `type`: DataType?

    /// perform data pointer operations unsafely.
    public func withDataPointer<R>(body: (UnsafeMutableRawPointer) throws -> R) throws -> R
}
Shape of a Tensor
To get the dimension of a tensor, use dim property:
public class Tensor {
    public var dim: [Int64]
}
Operation and Its Builder
An operation is a graph node that performs computation on Tensors.
To create an operation in a graph, check the workflow below:
- export an
OperationBuilderobject instance from a graph - set the operation name, type and device
- set the tensors of the operation
- add input / output
- set other attributes of the operation
- call
build()method and return an expected operation.
Here is an example:
// make a tensor, e.g., Tensor.Scalar(100)
let tensor = try TF.Tensor ...

let g = try TF.Graph()

// export an instance from the graph and set the name / type
let operation = try g.opBuilder(name: "Const_0", type: `Const`)

    // set attributes
    .set(attributes: ["value": tensor, "dtype": tensor.type])

    // build the operation
    .build()
OperationBuilder
OperationBuilder is defined as below:
public class OperationBuilder {
     /// constructor; using of graph.opBuilder() is more recommended.
    public init(graph: Graph, name: String, `type`: String) throws

    /// add an input to the operation
    public func add(input: Output) -> OperationBuilder

    /// add an input array to the operation
    public func add(inputs: [Output]) throws -> OperationBuilder

    /// add a control to the builder
    public func add(control: Operation) -> OperationBuilder

    /// build the operation
    public func build() throws -> Operation

    /// set the device
    public func `set`(device: String) -> OperationBuilder

    /// set attributes for the operation to build.
     /// parameter attributes: a dictionary of attributes of the operation,
     /// key for the attribute name.
     /// Valid attributes include Int64, [Int64], Float, [Float],
     /// Bool, [Bool], DataType, [DataType], String, [String],
     /// Shape, [Shape], Tensor, [Tensor],
     /// TensorProto, [TensorProto], Data
    public func `set`(attributes: [String: Any] = [:])
Operation
Once built by a OperationBuilder, all preset attributes and values of an operation can be read by the following properties and methods below:
| Instance Interface | Type | Description |
|---|---|---|
| fun attribute(forKey: String) | AttrValue | lookup an attribute in the current operation |
| var NodeDefinition | NodeDef | get node definition |
| var name | String | get operation name |
| var type | String | get operation type |
| var device | String | get operation device |
| var numberOfInputs | Int | get number of inputs of the operation |
| var numberOfOutputs | Int | get number of outputs of the operation |
| func sizeOfInputList(argument: String) | Int | get size of the input list array by an argument string |
| func sizeOfOutputList(argument: String) | Int | get size of the output list array by an argument string |
| var controlInputs | [Operation] | get control inputs as an operation array |
| func asInput(_ index:Int) | Input | generate an Input from the current operation |
| func asOutput(_ index:Int) | Output | generate an Output from the current operation |
Besides, Operation Class also have three different static methods:
| Static Method | Description |
|---|---|
| func Consumers(output: Output) -> [Input] | get the consumers of an output |
| func TypeOf(input: Input) -> DataType? | get type of the input |
| func TypeOf(output: Output) -> DataType? | get type of the output |
⚠️NOTES⚠️ More convenient methods to create an operation from a tensor in a graph can be found in the Chapter Graph
Output
Output is a symbolic handle using in TensorFlow and can be generate from Operation, you can simply treat an Output as "an Operation with an index number": let output = op.asOutput(0)
Graph
Graph is a data flow graph representing a TensorFlow computation. There are several different approaches to create a Graph object:
public class Graph {

    /// create a blank graph, just `let x = try TF.Graph()`
    public init () throws

    /// create a graph from a reference pointer,
    /// usually take place in array operation.
    public init(handle: OpaquePointer)
}
Besides, you can also import a pre-trained model into the graph, where definition is a GraphDef Protobuf which can be read / write from a binary file:
let g = try TF.Graph()
try g.import(definition: def)
Operations in a Graph
You can get all operations in a graph by accessing property operations, or using searchOperation(forName) to search an operation by name:
// search an operation in a graph instance:
let placeholder = try graph.searchOperation(forName: "placeholder")

// retrieve all operations into an array:
let list = graph.operations
// list is [Operation] now.
Common Operations
There is also a rich and growing set of methods for construct operations from different tensors in a graph, check the table below:
| Name | Description | Example |
|---|---|---|
| const | create an operation from a constant tensor | let x = try graph.const(tensor: t, name: "Const_0") |
| placeholder | create a placeholder operation | let feed = try graph.placeholder(name: "feed") |
| binaryOp | any binary operations between two outputs | func binaryOp(_type: String, _ in1: Output, _ in2: Output, name: String = "", index: Int = 0) throws -> Output |
| scalar | create an Int32 scalar | let ten = try graph.scalar(10, name: "ten") |
| scalar | create an Float32 scalar | let point = try graph.scalar(0.1, name: "point") |
| constantArray | create an array tensor and attach it to the graph | let size = try g.constantArray(name: "size", value: [1024,768]) |
| add | add two outputs | let sum = try graph.add(left:lOutput, right:rOutput, name: "sum") |
| add | add two operations (indices are automatically assuming to zero) | let sum = try graph.add(left:lOp, right:rOp, name: "sumOp") |
| neg | get the negative operation | let neg = try graph.neg(op, name: "MyNeg") |
| matMul | Matrix Multiply | let m = try graph.matMul(l: aOp, r: bOp, name: "m0", transposeA:false, transposeB: true) will perform an A x B^ multiplication |
| div | y Output divided by x Output | let z = try graph.div(x: x, y: y, name: "Div0") |
| sub | y Output subtracted by x Output | let z = try graph.sub(x: x, y: y, name: "Div0") |
| decodeJpeg | decode a JPEG picture | let decoded = try graph.decodeJpeg(content: input, channels: 3) |
| resizeBilinear | resize a bilinear image | let resizes = try g.resizeBilinear(images: images, size: size) |
| cast | cast an output to a specific data type | let cast = try g.cast(value: jpeg, dtype: TF.DataType.dtFloat) |
| expandDims | expand dimensions | let images = try g.expandDims(input: cast, dim: batch) |
A Full demo of almost all the express operation creations above can be found on the source code of Perfect TensorFlow Computer Vision Demo
⚠️NOTE⚠️ To load a graph from a saved model, use graph.load() method and will get a session object, see Load A Session
Session
A session object represents a round of execution of all computations defined in a graph.
The best practice to create a session is using a chain of operations of Runner object. Here is an example:
let results = try graph.runner()
    .feed("input", tensor: image)
    .fetch("output")
    .run()
Let's break it down a bit. The first step is to get a session runner instance: let r = try graph.runner().
Then you can feed some inputs into the runner:
class Runner {
    /// feed the session by using an output as input with a tensor
    public func feed(_ output: Output, tensor: Tensor) -> Runner

    /// feed the session by an operation with a tensor
    public func feed(_ operation: Operation, index: Int = 0, tensor: Tensor) -> Runner

    /// feed the session by an operation name with a tensor,
    /// in this case the graph will search for the operation by name first
    public func feed(_ operation: String, index: Int = 0, tensor: Tensor) throws -> Runner
}
Similar to feed, you can also indicate the session runner to fetch something out after the running:
class Runner {
    /// fetch the session to a specific output
    public func fetch(_ output: Output) -> Runner

    /// fetch the session to a specific operation.
    /// if index = 0, than it will be equivalent to fetch(output)
    public func fetch(_ operation: Operation, index: Int = 0) -> Runner

    /// fetch the session to a specific operation by its name
    public func fetch(_ operation: String, index: Int = 0) throws -> Runner
}
Then you can add target operations to the session as well:
class Runner {
    /// add an operation to the target
    public func addTarget(_ operation: Operation) -> Runner

    /// add an operation to the target by its name
    public func addTarget(_ operation: String) throws -> Runner
}
The final step of runner creation is to call the run() method and the result is an array of tensor:
class Runner {
    /// Execute the graph fragments necessary to compute all requested fetches.
    public func run() throws -> [Tensor]
}
Since you may want to feed / fetch / add targets to the session with more than one time, you can chain everything up like this:
let r = try graph
    .feed(op1, tensor: t1).feed(op2, tensor: t2)....
    .fetch(out1).fetch(out2).fetch(out3)....
    .addTarget("opA").addTarget("opB").addTarget("opC")...
    .run()
Load A Session Runner
To import a session object from a previously saved model, firstly create a blank graph, then use import method to load it back:
let g = try TF.Graph()

// the meta signature info defined in a saved model
let metaBuf = try TF.Buffer()

// load the session runner
let runner = try g.load(
    exportDir: "/path/to/saved/model",
    tags: ["tag1", "tag2", ...],
    metaGraphDef: metaBuf)
In this case, you can check the meta data stored in this previously saved model, if available, for more information:
if let data = metaBuf.data {
    let meta = try TF.MetaGraphDef(serializedData: data)
    let signature_def = meta.signatureDef["some signatures ..."]
    let input_name = signature_def.inputs["name of inputs ..."]?.name
    let output_name = signature_def.outputs["name of outputs"]?.name
    ...
}
If ready, you can call runner.run() as the previous chapter.
Device List of a Session
Since TensorFlow 1.3.0+, you can access device information by calling session.devices property, which will return a tuple array:
let dev = try g.runner().session.devices
print(dev)
// sample output:
// ["/job:localhost/replica:0/task:0/cpu:0": (type: "CPU", memory: 268435456)]
```